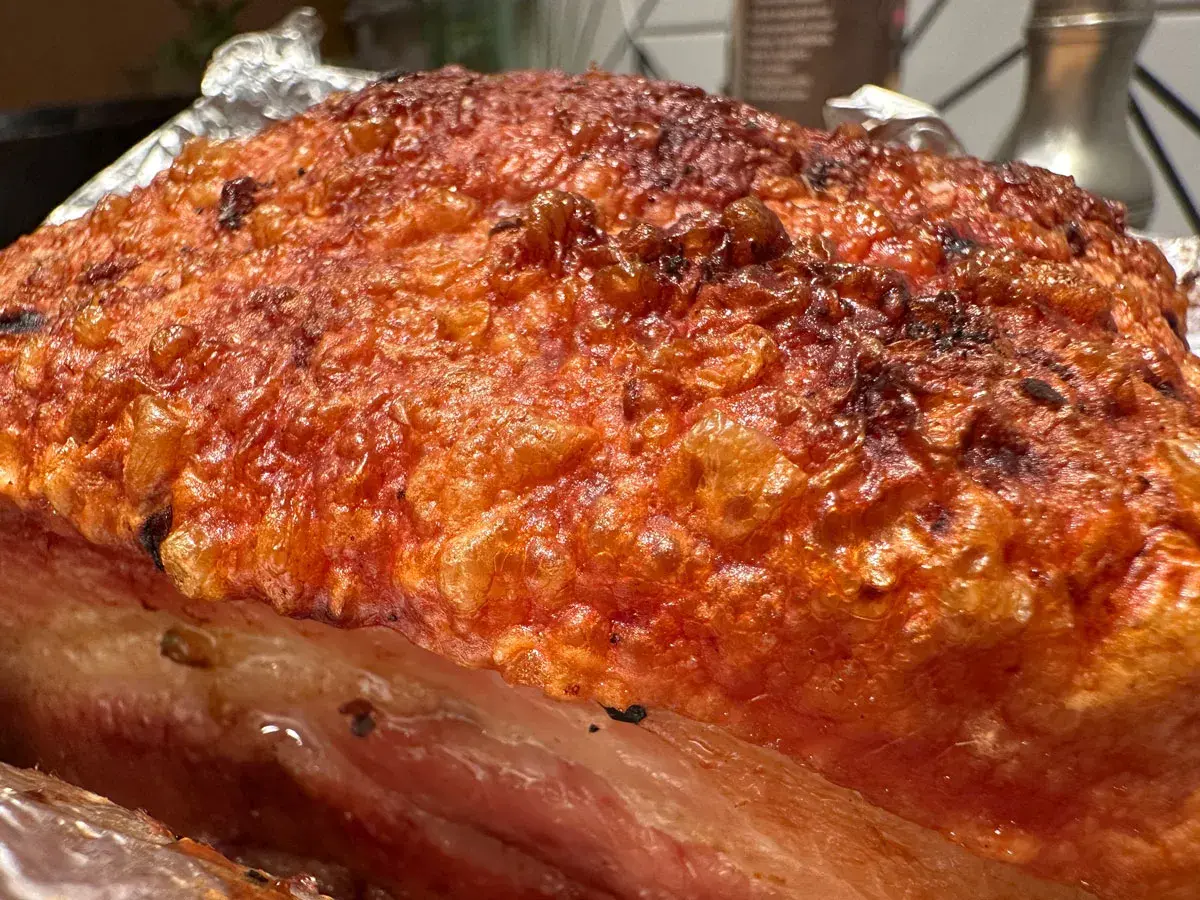
A good Iberico pork belly recipe should be more about restraint than disguise. The best results come from drying the skin, seasoning simply, roasting low and finishing hot so the crackling turns properly crisp. In this guide I cover how I treat the cut, what I season it with, the timings I rely on, and the Basque-leaning sides that suit it best.
The few things that make this roast work every time
- Use a skin-on slab of about 1.4-1.6 kg so the fat can render without drying out the meat.
- Dry the skin uncovered in the fridge for 12-24 hours before cooking.
- Roast gently at 160°C fan (180°C conventional), then finish hot at 230-240°C fan for crackling.
- Look for an internal temperature of about 88-92°C in the thickest part before the final blast.
- Keep the seasoning clean: salt, pepper, garlic, smoked paprika, and a little thyme or fennel.
- Serve it with something sharp or green, such as dry cider, beans, peppers, or a bright salad.
What makes Iberico pork belly worth treating carefully
Iberico belly is richer than standard pork belly, with a finer, almost buttery fat structure that rewards slow rendering. That is the reason I do not bury it under a heavy marinade or a sweet glaze. I want the pork to taste like pork, only deeper and cleaner.
In the UK, I look for a rind-on slab with even thickness and a firm fat cap. If the cut is too thin, it can dry out before the fat has time to do its job. If it is thick and well-trimmed, it behaves beautifully in the oven and gives you proper contrast: crisp skin, tender meat, and fat that has melted into the flesh rather than sitting on top of it.
| Feature | Iberico belly | What it means in practice |
|---|---|---|
| Fat | Fine marbling and a softer, richer fat profile | Use a gentler seasoning and let the oven do the work |
| Skin | Can blister well if it is dried properly | Dry overnight and finish with a strong heat burst |
| Flavour | Nutty, deep, and naturally savoury | Bright, acidic sides work better than a heavy sauce |
| Cooking style | Best with low-and-slow roasting, then a hot finish | One long blast is usually worse than two controlled stages |
That is the core idea behind the method I use: render the fat cleanly first, then crisp the skin without pushing the meat past the point where it still slices neatly. Once that logic is in place, the ingredient list becomes refreshingly short.

The ingredient list and flavour profile I use
I keep this version Basque-leaning rather than aggressively spiced. The pork should stay central, with a little pimenton, garlic, and thyme giving it shape. I also like a touch of cider in the tray because it fits the meat and gives me a useful base for the pan juices.
Read Also: Iberico Pork Chops - Master the Perfect Sear & Flavor
Ingredients
| Ingredient | Amount | Why I use it |
|---|---|---|
| Iberico pork belly, skin on | 1.4-1.6 kg | Main cut, enough for 4-6 people |
| Fine sea salt | 2 tbsp, plus a little extra | Draws moisture from the skin and seasons the meat |
| Black pepper | 1 tsp | Keeps the rub savoury |
| Smoked paprika | 2 tsp | Adds warmth without overpowering the pork |
| Garlic cloves, crushed | 4 | Classic with pork and useful in the tray juices |
| Thyme or rosemary | 2 sprigs | Herbal note that stays in the background |
| Olive oil | 1 tbsp | Helps the rub cling to the meat side |
| Small onion, sliced | 1 | Sweetens the roasting tray and lifts the sauce |
| Dry cider or dry white wine | 150 ml | Creates steam and flavour in the tray |
| Chicken stock | 100 ml | Keeps the tray from drying out too quickly |
| Sherry vinegar | 1 tbsp | Sharpens the pan juices at the end |
| Fennel seeds, lightly crushed | 1 tsp, optional | Nice if you want a more aromatic finish |
I skip sugar here. Iberico fat already gives you a gentle sweetness, and sugar can make the final blast feel sticky instead of crisp. If I want extra freshness at the table, I bring that in with peppers, herbs, or vinegar rather than with the rub itself.
How I cook it so the meat stays silky and the skin snaps
The timing below is the part that matters most. Belly is not a cut I rush. It needs enough heat to render, enough dryness to blister, and enough patience to rest before slicing.
| Stage | Temperature | Approximate time | What I am looking for |
|---|---|---|---|
| Drying | Fridge, uncovered | 12-24 hours | The skin feels dry and tight |
| Slow roast | 160°C fan / 180°C conventional | 1 hr 45 min to 2 hr 15 min | The meat becomes tender and the fat starts to render |
| Hot finish | 230-240°C fan / 250°C conventional | 15-25 min | The skin blisters and turns crackly |
| Rest | Room temperature | 15-20 min | The juices settle before carving |
- Score the skin lightly in narrow lines, or prick it all over with a very sharp knife if the rind is thick. I do not cut deeply into the fat; the goal is to open the skin, not butcher the meat.
- Pat the belly dry, then salt the skin generously. Put it on a rack, uncovered, in the fridge overnight if you can.
- Take it out 30-45 minutes before cooking so the chill comes off the meat side a little. Preheat the oven to 160°C fan.
- Put the onion, cider or wine, stock, garlic, and herbs into the tray. Set a rack over it if you have one. If not, make a foil base or use onion slices to lift the pork slightly.
- Rub the meat side with olive oil, pepper, smoked paprika, and any optional fennel seed. Keep the skin side clear so it can dry and crisp properly.
- Roast slowly until the thickest part of the belly reaches roughly 88-92°C and a skewer slides through with little resistance. For a 1.5 kg piece, that usually takes around 2 hours, but thickness matters more than the clock.
- Remove the pork and rest it briefly while you raise the oven to 230-240°C fan. If the tray looks dry, add a small splash of water to stop the juices from burning.
- Return the belly to the oven for 15-25 minutes, watching closely in the final minutes. If you want a very aggressive finish, use the grill for the last 1-2 minutes, but stay with it. Crackling goes from perfect to bitter quickly.
- Rest the cooked belly for 15-20 minutes before slicing. Meanwhile, skim some fat from the tray, add a spoonful of sherry vinegar, and reduce the juices slightly for a simple sauce.
I usually slice it into thick pieces rather than thin sheets. That keeps the texture intact and makes the contrast between crisp skin and soft meat more obvious. Once the method is fixed, the real fun is deciding what to serve alongside it.
What to serve with it in a Basque-style meal
Rich pork belly needs contrast. In a Basque-style meal, I like sharpness, beans, greens, and anything a little pickled or peppery. That is why this dish works so well with the food culture around the western Pyrenees: it loves balance more than excess.
| Side or drink | Why it works | My preference |
|---|---|---|
| Butter beans or white beans | They absorb the pork juices and soften the richness | Warm them with garlic, parsley, and a little olive oil |
| Roasted red peppers or piquillo peppers | Sweetness and acidity cut through the fat | Serve room temperature with olive oil and flaky salt |
| Piparras or another pickled chilli | Bright, sharp, and very effective against rich meat | A few on the plate are enough |
| Crushed new potatoes | Give the dish some structure without stealing the flavour | I dress them with vinegar, not butter |
| Green salad with a strong vinaigrette | Keeps the plate from feeling heavy | Use mustard, cider vinegar, and good olive oil |
| Dry cider or a crisp white wine | Matches the pork without adding sweetness | Dry English cider works especially well in the UK |
If I am serving it more casually, I turn it into thick slices on toasted bread with peppers and a little of the tray sauce. If I am serving it as a main, I keep the plate cleaner and let the pork sit beside beans and greens. That is when the dish feels most balanced, and it also makes the mistakes easier to spot.
The mistakes that ruin a good slab faster than bad seasoning
Most failures with pork belly are not caused by the rub. They come from moisture, heat, or impatience. Iberico is too good a cut to waste on any of those.
- Skipping the drying step leads to leathery skin instead of crackling. The fridge time is not optional if you want a crisp finish.
- Starting too hot can tighten the meat before the fat renders. That gives you chewy edges and greasy fat instead of soft belly.
- Using too much sugar can burn on the final blast. If you want sweetness, add it later in the sauce or from the sides.
- Overcrowding the tray traps steam around the skin. Give the pork enough space so hot air can circulate.
- Slicing immediately makes the juices run out. A short rest changes the texture more than most people expect.
There is one more nuance worth mentioning: if your piece is very thick, it may need another 15-25 minutes at the low stage before the skin finish. That is not a failure, just the reality of cooking by texture rather than by a rigid timer. I would always trust a skewer and a thermometer over a recipe clock.
What I would keep in mind the next time I cook Iberico belly
The strongest version of this dish is the simplest one. I season lightly, dry the skin properly, cook gently until the belly is tender, and only then push the heat high enough to crack the top. The fat in Iberico pork does a lot of the work for you, so the real skill is not in adding more, but in stopping at the right moment.
If I had one rule for this cut, it would be this: keep the flavours clean and give the pork room to speak. That is why I keep coming back to this style of cooking, especially with sharp beans, peppers, and cider on the side. It feels generous, but never muddled, which is exactly what a good pork belly dish should be.
